
Routing rules and A/B testing
Author per-link routing, run A/B experiments with full lifecycle control, and set up deep links.
What routing rules do
By default, every short link sends all visitors to a single destination. Routing rules let you break that one-to-one relationship. With routing rules, you can:
- Send visitors to different destinations based on where they are, what device they're using, or what time it is.
- Run A/B experiments that split traffic across multiple destinations and track engagement by variant.
- Route mobile visitors directly into your native iOS or Android app via deep links.
Prerequisites
- An active workspace with routing rules enabled (plan-gated).
- For deep links: a verified, ready, account-exclusive custom branded domain.
How the redirect decision works
Every click on a short link triggers Nimriz's evaluation chain. Routing rules are only reached after earlier checks pass:
| Priority | Check | What happens if triggered |
|---|---|---|
| 1 | Reserved paths (/_health, /.well-known/*, /api/*) | Handled as system paths, never reach routing. |
| 2 | Domain readiness | Unready domains serve a fallback; routing does not run. |
| 3 | Pending account deletion | Not-found landing; routing does not run. |
| 4 | Missing slug | Not-found fallback; routing does not run. |
| 5 | Link expired | Expired landing; routing does not run. |
| 6 | Password gate | Password prompt; routing does not run until unlocked. |
| 7 | Link disabled or flagged | Fallback behavior; routing does not run. |
| 8 | Routing rule evaluation | First matching enabled rule wins. |
| 9 | Deep link action resolution | Applied to the winner or default destination. |
| 10 | Query forwarding / merge | Applied after final destination is chosen. |
| 11 | Click analytics | Recorded before the final redirect response. |
| 12 | Redirect response | Visitor reaches the destination. |

Routing conditions
Each rule can match visitors based on any combination of these conditions. All conditions on a rule must match simultaneously (AND logic).
| Condition | Values | Notes |
|---|---|---|
| Country | ISO 2-letter code (US, DE, GB, etc.) | One or more countries. |
| Device OS | ios, android, windows, macos, linux | Use the Nimriz-normalized taxonomy. |
| Device type | mobile, tablet, desktop | Derived from User-Agent. |
| Time window | Recurring time-of-day windows (start and end time, plus optional days of the week) | Evaluated in UTC. |
A rule with no conditions is a catch-all-it matches every visitor. Catch-all rules belong at the bottom of your list.
Rule evaluation order
Rules are evaluated in strict top-to-bottom order. The first enabled rule that matches wins. Subsequent rules are not evaluated.
This means:
- Put your most specific rules (e.g., Country=US AND DeviceOS=ios) near the top.
- Put broader rules (e.g., Country=US) below more specific ones.
- A catch-all rule at the top intercepts all traffic before any specific rules below it.
Use the routing simulator to verify order before publishing.
Setting up routing rules
- Open the link's detail page.
- Navigate to the Routing Rules tab.
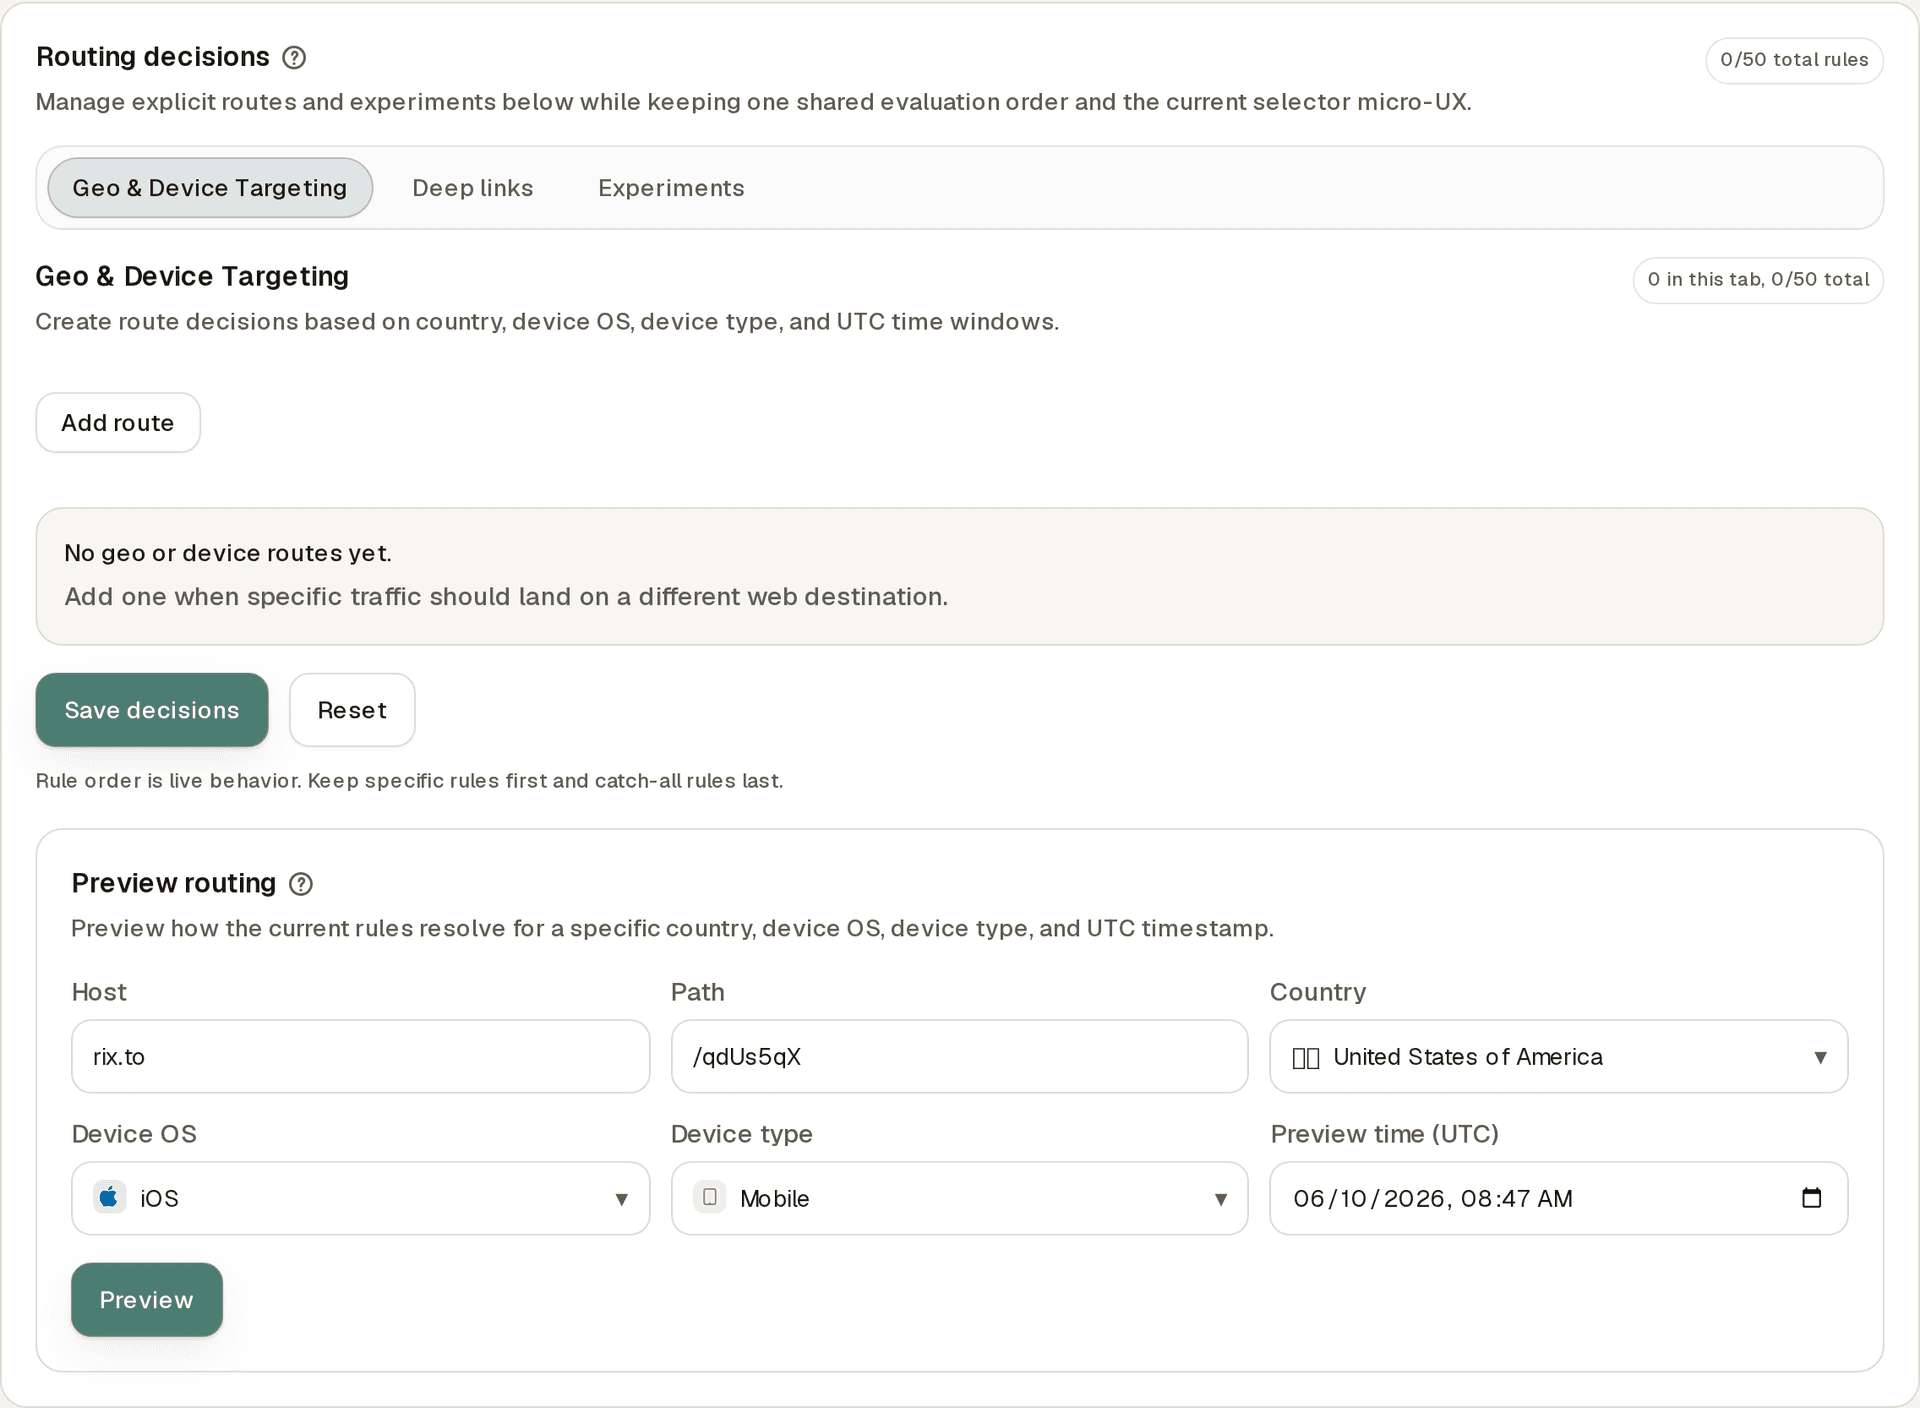
- In Geo & Device Targeting, click Add route.
- Set conditions (or leave empty for a catch-all).
- Set the destination URL for this rule.
- Repeat for additional rules.
- Reorder rules as needed. Order matters-the first matching rule wins.
- Click Save decisions to publish the full ruleset.
A/B testing with Experiments
Experiments let you split traffic across multiple destination variants and compare performance.
Step-by-step: setting up an A/B experiment
- On the link's Routing Rules tab, switch to the Experiments mode and click Add experiment.
- Give the experiment a label (for your reference).
- Add variants:
- Each variant has a destination URL and a traffic weight (percentage).
- Weights must total 100%.
- Example: Variant A (50%,
https://example.com/v1), Variant B (50%,https://example.com/v2).
- Optionally add targeting conditions (same condition types as regular routes). This limits the experiment to visitors matching those conditions.
- Optionally set a Lifecycle schedule: a start time and/or an end time (both in UTC), plus the After end behavior.
- Tick the experiment's Enabled checkbox and click Save decisions. With no future start time, the experiment goes live and starts splitting traffic immediately; with a future start time it waits in Scheduled until then.
Experiment lifecycle
Experiments move through explicit states. Understanding the states helps you manage experiments correctly.
| State | What it means | How to get here |
|---|---|---|
| Draft | Created but not yet live. Traffic is not split. | Save a new experiment with its Enabled checkbox off. |
| Scheduled | Will automatically start at the configured start time. | Save an enabled experiment whose start time is still in the future. |
| Running | Live. Traffic is being split across variants. | Save an enabled experiment with no future start time, or reach the scheduled start time. |
| Paused | Stopped temporarily. Traffic is not split; visitors fall through to the next matching rule or the default destination. | Untick Enabled on an existing experiment and save. Historical data preserved. |
| Completed | The scheduled end time has passed. No longer splitting traffic; the configured After end behavior applies. | Automatic at the scheduled end time. |
| Promoted | A winning variant was chosen. All traffic goes to that variant's destination. The experiment is read-only history. | After end behavior set to Promote a chosen variant, with a winning variant selected. |
State transition rules:
Draft → RunningorScheduled: enable the experiment and save (a future start time means Scheduled).Running → Paused: disable the experiment and save. Can be re-enabled later.Paused → Running: re-enable and save.Running → Completed: automatic at the scheduled end time.Completed → Promoted: via the schedule's After end behavior Promote a chosen variant.
Sticky variant assignment
Once a visitor is assigned to a variant, they always see the same variant on subsequent visits. This stickiness ensures consistent user experience during the experiment.
Stickiness is cookie-backed and per browser/device:
- A visitor on their laptop always sees Variant A (if assigned to A).
- The same visitor on their phone starts fresh and may be assigned to a different variant.
- Clearing cookies resets the assignment.
Scheduling experiments
You can pre-schedule an experiment to start and end automatically in the experiment's Lifecycle section:
- Start time (UTC): An enabled experiment stays in Scheduled state and automatically transitions to Running at this time.
- End time (UTC): The experiment automatically moves to Completed at this time, and the After end behavior takes over: Route to control variant, Promote a chosen variant, or Fall through to the next decision.
Scheduling is optional. You can also start and stop manually by enabling or disabling the experiment and saving.
Promoting a winner
After your experiment has run and you are satisfied with the results, promote the winning variant:
- In the experiment's Lifecycle section, set After end to Promote a chosen variant and pick the winner in the Promote variant selector. When the scheduled end time passes, all traffic routes to that variant.
- Alternatively, in the lightweight A/B editor on the link detail page, use a variant's Send 100% traffic here action to route all traffic to it immediately.
What happens when a variant is promoted:
- All future visitors are routed to the winning variant's destination.
- The experiment moves to Promoted state and becomes read-only history. Historical data is preserved.
Important: Nimriz does not automatically select a winner or calculate statistical significance. You always choose the winning variant yourself.
Analytics by variant
When an A/B experiment is running, click analytics are attributed to stable variant keys-internal identifiers that never change, even if you rename the variant's display label.
In the link's analytics:
- Clicks are broken down by variant key.
- The current variant label is shown next to each key where known.
- If you renamed a variant, historical clicks are still attributed to the original key-not the new name.
- If you promoted a winner, historical experiment clicks remain under their original keys, and post-promotion clicks stay attributed to the promoted variant's key.
Deep links
Deep links route mobile visitors directly into your native iOS or Android app, bypassing the browser.
Eligibility requirements
| Requirement | Why |
|---|---|
| Custom branded domain | App association files must uniquely represent one brand. |
| Domain is account-exclusive | Shared domains cannot serve app association files for multiple brands. |
| Domain is verified and Ready | App association files are served from the live domain. |
| Full app metadata configured | iOS bundle ID + Team ID, and/or Android package name + SHA-256 fingerprint, saved in the domain's Mobile app section and shown on its Deep link readiness card. |
Deep link fallback sequence
Nimriz resolves every deep-link action deterministically, starting with the app target and then following the configured fallback order:
- App target-attempt to open the configured mobile app.
- Store or web fallback-the order is configurable per rule (with a domain-level default): App, then store, then web sends visitors without the app to the App Store (iOS) or Google Play (Android) before the web URL, while App, then web, then store prefers the web fallback URL.
- Visitors on unsupported platforms (desktop, bots) always go to the web fallback URL.
Setting up deep links
- Ensure your custom domain meets all eligibility requirements.
- In the domain's Mobile app section, save your app metadata:
- For iOS: App Bundle ID and Apple Team ID.
- For Android: Package name and SHA-256 signing key fingerprint. Open the domain under SettingsOrganizationDomains. The Deep link readiness card shows the saved apps and their status.
- Wait for the Deep link readiness card to show Ready.
- On the link's Routing Rules tab, switch to Deep links and click Add smart-mobile route. Configure the iOS app URL and/or Android app URL, the Web fallback URL, and the fallback order.
Routing preview (simulator)
The routing simulator lets you test your configured rules without generating real traffic.
How to use it
- Open the link's Routing Rules tab and find the Preview routing panel.
- Set the simulation inputs:
- Country (ISO 2-letter code)
- Device OS
- Device type
- UTC timestamp (for time-window rules)
- Click Preview to run the simulation.
The simulator evaluates your current draft rules exactly as they would run in production and shows:
- Which rule matched (or "default destination" if no rule matched).
- The winning destination URL.
- The match reason.
An enabled route with no conditions matches every preview context. The UTC timestamp affects time-window rules and scheduled experiments.
What the preview cannot simulate
- App installation-the simulator shows which deep-link target Nimriz would choose, but cannot confirm whether the visitor's device has the app installed.
- Sticky A/B assignment-the simulator uses a first-visit posture. It does not replay historical cookie-based sticky assignments.
Troubleshooting
Traffic is reaching the wrong destination
- Check rule order-open the routing panel and review the ordered list. A broad catch-all rule above specific rules intercepts all traffic before the specific rules fire. Reorder so specific rules are above broad ones.
- Check that rules are enabled-disabled rules are stored but skipped. Verify the rule you want active is not greyed out.
- Use the simulator-simulate the visitor's exact context (country, OS, device type) to see which rule Nimriz applies.
A/B experiment is not splitting traffic
- Confirm the experiment is in Running state (not Draft or Scheduled).
- If you test from the same browser, you will consistently see the same variant due to sticky assignment. Test from a different browser or use a private window to simulate a fresh visitor.
Deep links are not opening the app
- Check the domain readiness indicator-it must show Ready, not Unsupported, Needs app metadata, or Needs domain readiness.
- Verify the app is configured to handle Universal Links (iOS) or App Links (Android) for your domain-this is an in-app developer configuration outside Nimriz.
- Test on a real device. Emulators and browser-based testing cannot simulate deep link behavior accurately.
- Visit
https://yourdomain.com/apple-app-site-associationandhttps://yourdomain.com/.well-known/assetlinks.json-these must return valid JSON, not 404.
Related guides
Related next steps
Follow setup and reference guides for Nimriz products and integrations.
A practical redirect decision guide for marketers and product teams choosing between permanent 301 redirects and flexible 302 links.
Route Nimriz short links based on visitor country, device type, and operating system - serve the right destination to every audience segment from one link.
You printed 10,000 flyers with one QR code. Here is how to test two landing pages, read the split, and promote a winner without reprinting a thing.
Ready to test this setup?
Create an account to try the workflow, or compare plans when the setup needs higher limits, integrations, or team controls.