
DNS verification
Learn how DNS verification works, where to publish provider-specific records, and what to check when a custom domain is stuck.
Why DNS verification is required
DNS verification proves that you are the authorized owner of the hostname you want to use as a Nimriz short-link domain. Without this step, anyone could claim your branded domain and create links that appear to originate from your brand.
Verification is a one-time step per domain. Once verified, you do not need to repeat it unless the routing record is removed from your DNS.
What you are publishing
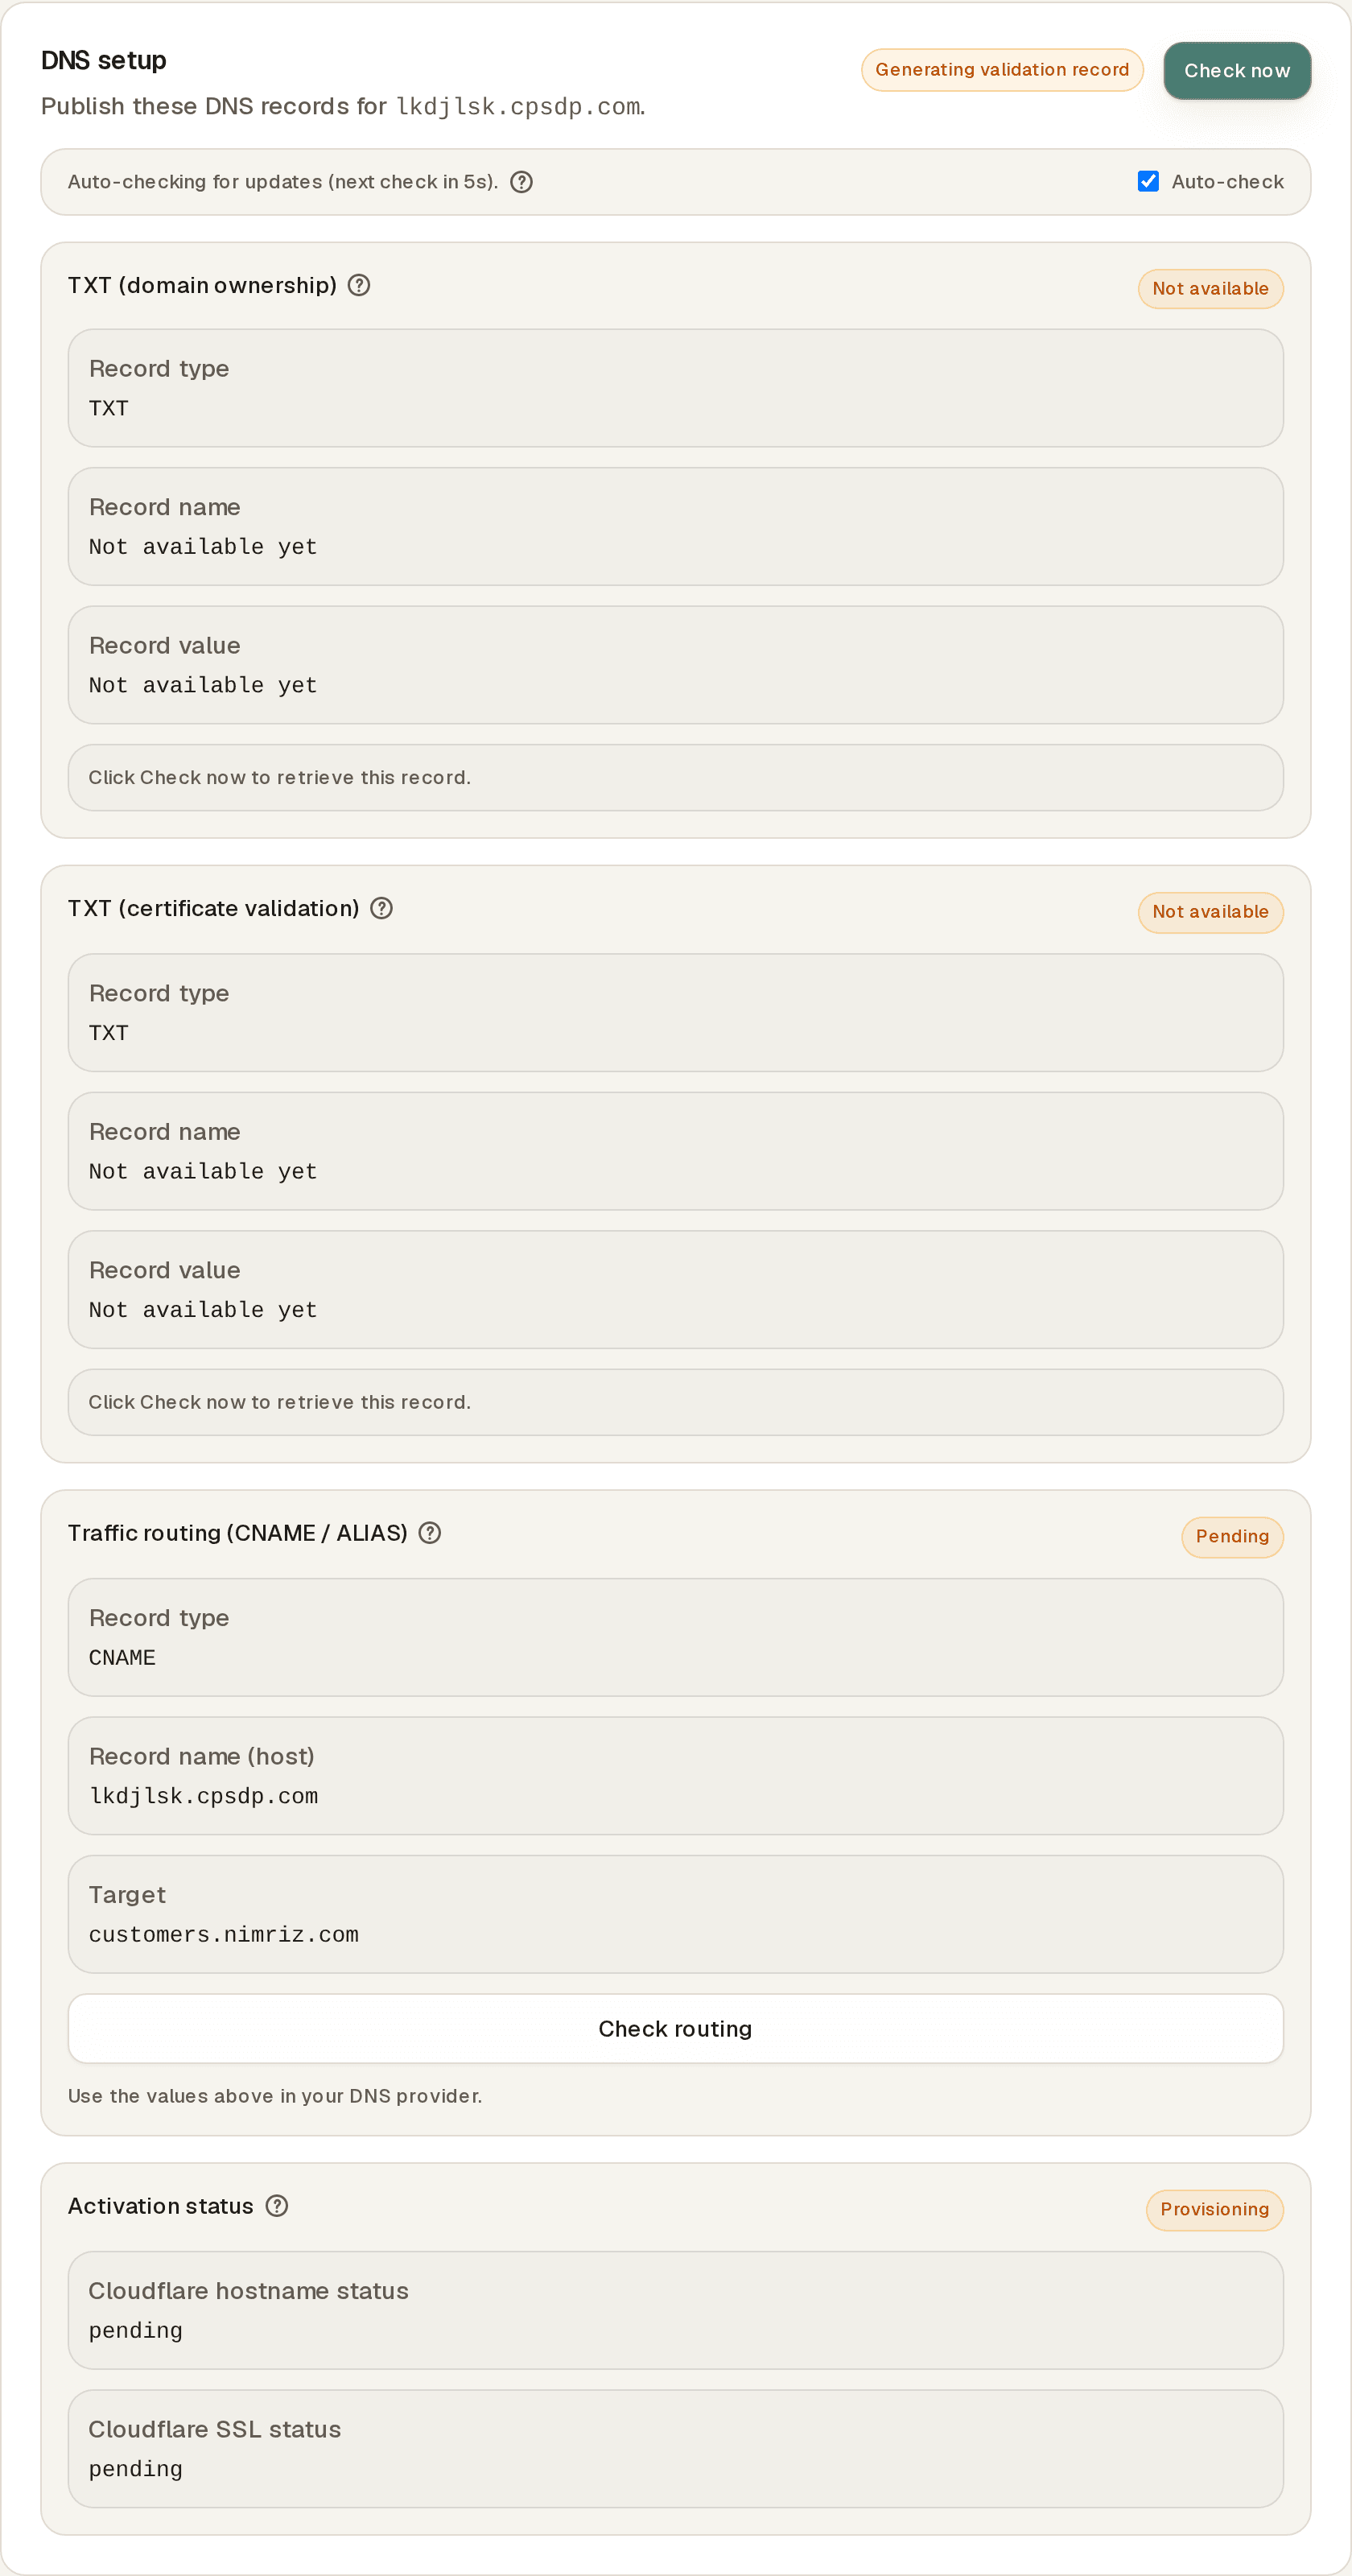
The DNS setup panel for your domain centers on one record:
- Traffic routing (CNAME / ALIAS) - points your hostname at the Nimriz edge so redirects work. In most setups this is the only record you need: ownership is confirmed and the SSL certificate is validated automatically once routing is live.
Two more steps are tracked in the panel and usually complete on their own:
- TXT (domain ownership) - proves you control DNS for the hostname. A TXT record is only listed here when Cloudflare requires pre-validation for your hostname.
- SSL certificate - shows Automatic when no action is needed, or lists a TXT record when manual certificate validation is required.
When a TXT record is listed, the panel shows its Record name and Record value. Copy them exactly-do not retype them. Once a step shows Verified or Certificate issued, its TXT record is no longer needed and can be removed from your DNS provider.
Step-by-step verification

- Copy the record details from your Nimriz dashboard (SettingsOrganizationDomains → your domain → the DNS setup panel).
- Log in to your DNS provider-this is wherever you manage DNS for the domain (e.g., Cloudflare, Route53, GoDaddy, Namecheap, Hover, or your web host's DNS panel).
- Create the routing CNAME (or ALIAS for apex domains) pointing at the target shown in the panel, plus a TXT record for any entry the panel lists (see Custom domain setup).
- Save the records at your DNS provider.
- Return to Nimriz and click Check now on your domain's DNS setup panel.
Nimriz checks the routing record plus any TXT records the panel lists. The domain moves to Verified status once everything matches.
How to enter records at common providers
Cloudflare
- Go to your Cloudflare dashboard → DNS → Records.
- Click Add record.
- For the routing record, set Type to CNAME, enter your hostname prefix as the Name, and the target from the DNS setup panel as the Target.
- Make sure the Proxy status is DNS only (grey cloud icon). This applies to the CNAME and to any TXT records: proxied records hide where your hostname points and verification cannot confirm them.
- For a listed TXT record, set Type to TXT and enter the Record name exactly as shown. Cloudflare automatically appends your root domain, so if the full name ends in your zone name (
example.com), enter just the prefix before it. Paste the Record value into the Content field. - Set TTL to Auto and click Save.
AWS Route 53
- Go to Route 53 → Hosted zones → your domain.
- Click Create record.
- Enter the subdomain part of the Record name in the Record name field (the portion before your root domain).
- For routing, select type CNAME and enter the target from the DNS setup panel. For a listed TXT record, select type TXT and paste the Record value enclosed in double quotes. Route 53 requires TXT record values to be quoted.
- Click Create records.
GoDaddy
- Log in to GoDaddy → My Products → DNS.
- Click Add under DNS Records.
- For routing, select CNAME and point the Host prefix at the target from the DNS setup panel. For a listed TXT record, select TXT and paste the Record value from Nimriz.
- In the Host field, enter the subdomain prefix only (GoDaddy appends the root domain automatically).
- Set TTL to 600 (10 minutes) or lower for faster propagation.
- Click Save.
Namecheap
- Log in to Namecheap → Domain List → Manage → Advanced DNS.
- Click Add New Record.
- For routing, select CNAME Record and point the Host prefix at the target from the DNS setup panel. For a listed TXT record, select TXT Record and paste the Record value from Nimriz.
- Enter the Host as the subdomain portion only, without the root domain.
- Set TTL to automatic.
- Click the checkmark to save.
How long propagation takes
DNS changes take time to spread across the global DNS infrastructure. The time depends on:
- Your DNS provider's processing speed (usually seconds to minutes).
- The TTL (Time to Live) of the record-lower values mean faster propagation.
- Upstream caching by DNS resolvers around the world.
Most records propagate within 5-15 minutes. In some cases it can take up to a few hours. If a record was checked before it existed, some resolvers can keep reporting it as missing for up to 30 minutes. If verification is still failing after an hour, proceed to the troubleshooting steps below.
You can check whether your records are visible using a DNS lookup tool:
dig CNAME <your hostname>
Or use an online tool like dnschecker.org to see the record from multiple global locations.
Triggering a manual re-check
If you believe your DNS record is live but the domain is still showing Pending, you can manually trigger a re-check:
- Go to SettingsOrganizationDomains in your Nimriz dashboard.
- Open the domain showing Pending status.
- Click Check now in the DNS setup panel.
Nimriz will immediately query DNS again. If the record is found, the domain transitions to Verified.
After verification: what happens next
Verification confirms ownership. After that, Nimriz also needs to activate routing for your hostname at the Cloudflare edge before redirects go live. This activation (which provisions SSL and routes traffic) happens automatically and typically completes within 5-15 minutes of the routing record going live.
The domain reaches Ready status once both steps are complete. Your domain is ready for link creation and live traffic only when it shows Ready-not just Verified.
Troubleshooting
Verification fails even after adding the records
- Confirm the routing CNAME (or ALIAS) points at the exact target shown in the DNS setup panel-it is the record the verification check requires.
- If you are using Cloudflare, confirm the records are set to DNS only (grey cloud). Proxied records are not visible to external DNS queries.
- For a listed TXT record, check the exact record name against the panel. The most common mistake is publishing the record on the root domain instead of the full record name Nimriz shows.
- Check for extra spaces or invisible characters in the Record value. Copy directly from the Nimriz dashboard-do not retype manually.
Verification succeeds but the domain never reaches Ready
- After verification, Cloudflare still needs to activate the hostname and issue the SSL certificate-the panel shows Provisioning SSL during this stage.
- If the domain is still not Ready after 30 minutes, contact support with your domain name and workspace ID.
A verification record was removed accidentally
If the routing CNAME was removed, re-add it; redirects depend on it. TXT records for steps that already show Verified or Certificate issued are no longer needed, so removing them has no effect. Nimriz re-verifies the next time you click Check now (the panel also auto-checks while it is open).
Related guides
Related next steps
Ready to test this setup?
Create an account to try the workflow, or compare plans when the setup needs higher limits, integrations, or team controls.